


How To Fix Your Keurig Coffee Maker - Troubleshooting Tips
Keurig is an incredibly popular and well-recognized brand of coffee maker with a worldwide following. Its top-quality build and design make it the ideal choice for many coffee lovers. However, like most coffee makers, it can sometimes experience some problems - which is why troubleshooting and getting to the bottom of any issue is vital. To help you out, here are some of the most common Keurig problems and how to fix them effectively.
How To Put A Stop To Leaks From Your Keurig

Leaking hot water or coffee from your coffee maker is a major issue that should be addressed immediately. However, with the right maintenance, you can ensure your appliance will provide years of reliable use and countless cups of delicious drinks. If your machine begins to leak, there is likely a quick and easy fix.
You're in luck if your coffee machine brews slowly; it just needs to be cleaned. Cleaning a coffee maker is an easy process that requires no more time than making one cup of coffee.
To fix a leaking Keurig coffee maker, you have two options: buy and install a new tank or follow the simple steps below to clean your current one with vinegar. And if your beloved Keurig won't brew anymore, here's a simple solution to get it fixed.
Step 1: Cleaning with Vinegar and Water
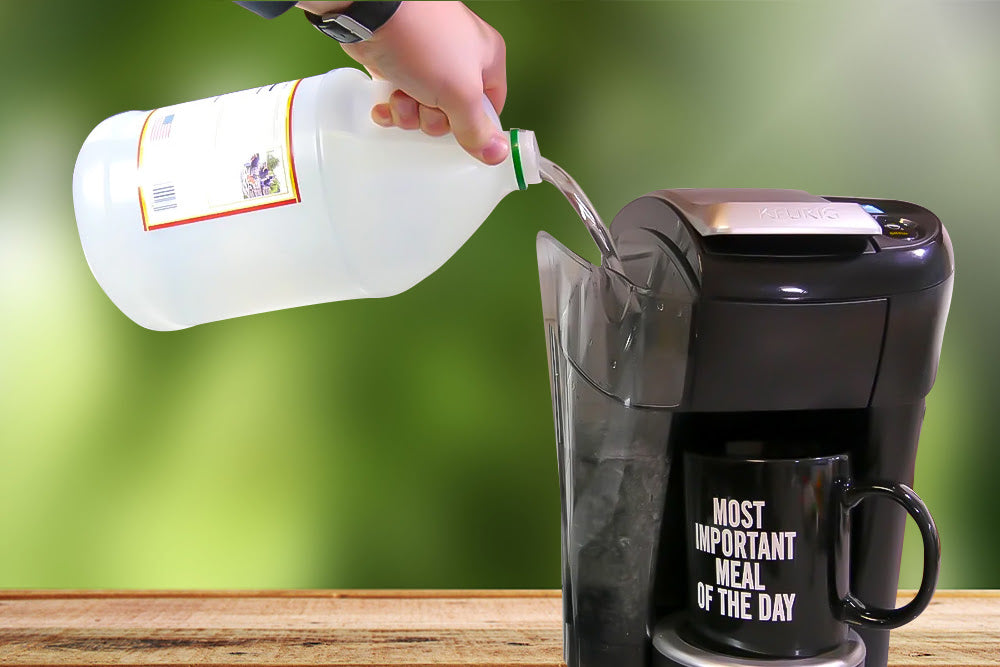
When your coffee maker is clogged, you can use a combination of white vinegar and water to clean it. You should not use this solution with any other cleaning agent or chemicals. Depending on the machine's capacity, you should mix 11 cups of vinegar with 1 cup of water for a 12-cup-sized machine. Pour this mixture into the container and run it through a cycle just as you would normally make coffee. This should help dissolve any deposits that could be causing clogs and leaks, although several cycles may be required if the machine has not been cleaned in some time.
Step 2: Check The Pump Valve

When making sure that your coffeemaker is working properly, it's important to check its pump valve too. During operation, this valve ensures that water can flow freely from the fill tube - without it, the water cannot rise up and pass through the tube. Suppose there's an issue here, then the entire pump will need to be replaced. It's also worth checking if any blockages are caused by grounds or mineral buildup, as these can cause disruption too.
Step 3: Take A Look At The Brew Switch

The brew switch must be checked to ensure it is functioning correctly. To do this, you'll need to remove the motherboard to access the prime switch beneath it, which can then be tested using a voltmeter set to RX1 scale. If your reading comes back as 0, then you know everything is alright, but if not, then flipping this switch may be necessary for things to work properly again.
Step 4 – Check The Pipe Connectors

Finally, pipe connectors are another area worth examining to rectify any leaking or stuttering issues. These are common where problems arise due to faulty fittings or angles, so cleaning these surfaces before replacing them can help sort out potential leaks quickly and easily. When replacing connectors, both pieces fit together correctly; using an elbow connector and a new tube should ensure this happens in most cases.
Keurig Not Dispensing Water
If you have trouble with your Keurig coffee machine not pumping water, the issue may be due to debris and mineral buildup in the reservoir or pipes. Not only can this stop the machine from dispensing hot drinks, but it can also cause various other problems. To ensure that your machine continues to run smoothly and efficiently, it is important to perform regular maintenance, such as descaling and cleaning the machine.
When descaling a Keurig coffee maker, it is highly recommended that you use a water filter on your Keurig coffee maker. This will help keep it free from sediment and mineral buildup over time, ensuring you can enjoy delicious beverages without trouble. Additionally, you should replace the water filter every three months, depending on how often you use the machine.
If you are experiencing problems with your Keurig not being able to pump water into the reservoir or K-Cups, there may be an issue with your water pump failing or clogged up with debris. If this is the case, then it's time to find a replacement part for your Keurig coffee machine. You should take special care when replacing any parts of your machine, as incorrect installation could lead to further complications.
It's quite possible that if your Keurig has stopped pumping water properly, there might be hidden chunks of debris inside the machine, blocking its operation and causing damage over time. Therefore it's important to ensure that any parts you are replacing are installed correctly to avoid these types of issues reoccurring.
No matter what type of problem you're facing with your machine, if descaling isn't sorting out the issue, then it's best to refer back to these tips and tricks provided when troubleshooting your problem before making any further attempts at repairs or replacements on your own. Though some more advanced techniques are available for those with experience dealing with these types of machines, following these basic steps will usually help get your Keurig up and running again without too much difficulty in most cases.
Why Isn't My Keurig Brewing Enough Coffee?

When it comes to Keurig coffee makers, a common problem that many users run into is that the amount of coffee brewed by the device is too small. This issue can be very frustrating and make it difficult for people to get their desired coffee in the morning. Fortunately, a few workarounds and solutions to this problem can help users get the most out of their machines.
One of the first things that should be done is to look over the instructions for the Keurig machine and see if there are any explanations for why it may not be brewing an adequate amount of coffee. Users should also take some time to research how they can use their machine more efficiently and what other problems might arise from repeated usage.
Another way to ensure that your machine is performing optimally is to make sure that you are cleaning and maintaining it regularly. This includes ensuring that the water levels are appropriate and checking on how clean and/or clogged up the filter may be. Depending on which model you own, some Keurig machines allow users to manually clean or change out their filters themselves to achieve better results with their brewing process.
Reading reviews on different models of Keurig machines can also be beneficial since this gives users a chance to hear from others who have experienced similar issues with theirs. People can find out whether or not they should trust their brand name product and share additional details about what needs to be done to get better results with their machine.
If needed, users can always invest in repairs for their Keurig machine to ensure optimal performance. To do this, though, people need to make sure they find a reliable repair team who has experience working with these devices before, so they know exactly what needs doing for it to work correctly again. These steps will help people save time and money by avoiding further damage caused by improper repair attempts or incorrect replacement parts.
How To Fix a Bitter Cup of Coffee From a Keurig Machine

Many people have been disappointed with the taste of their Keurig coffee. This can be caused by several factors, including the type of K-Cup you are using, blockages in your machine that can cause stale coffee grounds and calcium to seep into your new brew, and old water in the reservoir.
To help make sure you're brewing top-quality coffee from your Keurig, it's important to mix up the types of K-Cup you regularly use so you don't get too used to one flavor. Plus, regularly clean your machine as recommended by the manufacturer - this is essential to ensure any old grounds and calcium residue don't contaminate future brews. Regular cleaning also helps keep your coffee tasting great and may even save you money by extending the life of your machine.
In addition, it's important to use fresh water every time you brew coffee to avoid bitterness or an off flavor. Over time, minerals can build up in your water reservoir and make for a less enjoyable cup of joe. Using filtered or spring water rather than tap water can reduce mineral buildup, but at a minimum, try to change out the water at least once a week for optimal results.
At the end of the day, if you want consistently great-tasting Keurig coffee, it takes more than just sticking with one type of K-Cup - regular maintenance is key. Cleaning your machine regularly according to manufacturer instructions and using fresh water each time will help ensure that each cup tastes as good as possible and last longer between cleanings.
How To Fix a Keurig Dispensing Too Much Coffee

If your Keurig coffee machine is no longer brewing the right amount of coffee, it could result from a blocked water line. Fortunately, this is an easy problem to fix and can be done with just a few simple steps. Firstly, you want to ensure that your cold water reservoir is properly seated in the machine and correctly aligned.
Afterward, run several brewing cycles with just water. If the issue persists, try running equal parts vinegar and water through the same process. The vinegar will help break down any minerals or grounds clogging up the line. Afterward, run a few more cycles with only water to wash out the vinegar taste.
An additional step you can take if your Keurig still isn't pouring as it should is to clean around the needle, which pierces the K-Cup during brewing. Coffee grounds can get stuck on the base of this needle and prevent it from puncturing properly, resulting in an incomplete cup of coffee. By taking these steps, you should have your Keurig working as expected in no time.
It's important to remember that regular maintenance can help keep these issues at bay. Cleaning both around the needle and running periodic cleaning cycles with vinegar and water can do wonders for avoiding problems like an insufficient pour or poor-tasting coffee. Taking a few minutes every once in a while to ensure everything's functioning properly can go a long way toward ensuring that your Keurig will always provide you with excellent cups of coffee each time you use it.
How to Fix a Keurig That Won't Heat

If your Keurig is not heating or producing hot beverages as you expect, it's likely because the water pump is not functioning correctly. This can cause the heating mechanism to shut off fully, which is a safety measure designed to prevent your coffee maker from overheating.
To fix this issue, first, reset your water reservoir. In addition, you can try holding down the brew button for 5+ seconds, as this will allow the machine to purge any remaining water in the tank. If that doesn't help, give your machine a gentle hit on the side to re-align any parts that may have been moved out of place.
Coffee grounds, dirt, and dust can get stuck inside your Keurig over time and cause major problems like this one. It's also possible that it could be something more serious such as a motherboard problem or an issue with other important components within the machine. These technical issues require customer service support to be resolved properly, and they are rarely easy to troubleshoot without professional assistance.
Contacting customer service should be done as soon as possible if these methods don't do anything for the device's performance so that the situation can be assessed and fixed by experienced technicians quickly and efficiently.
Keurig Duo Troubleshooting

Keurig Duo is a trusted coffeemaker brand, but troubleshooting it can be challenging. If you're having difficulty with your Keurig Duo, the first thing to do is power off the machine and thoroughly clean it. This is usually enough to resolve any issues you may be having. However, if the problem persists after performing the necessary maintenance, contacting Keurig customer service for assistance may be your best bet.
How To Reset Your Keurig

When you wake up in the morning, there's nothing better than a cup of hot coffee to start your day. However, it can be quite frustrating if your Keurig suddenly stops working or isn't brewing correctly. Luckily, this issue can be resolved by simply turning the machine off and on again.
Sometimes, however, this won't do the trick, and you may need to reset your Keurig entirely. To do so, press both the small mug and medium mug buttons before releasing them. Pressing the menu three times should cause the clock display to read 6:09. Then press the menu once more, and you will see "brew 0:00" appear on the screen.
Once that is done, keep pressing the medium mug button while also pressing and releasing the menu quickly. Then without releasing a medium mug button, press a small mug and release both buttons together at the same time. This should reset your machine back to its original settings. If, after going through these steps, your machine isn't functioning properly, we suggest contacting customer service, which can provide more help.
It's important to understand why your Keurig has malfunctioned or stopped working to know how best to fix it quickly and effectively. In some cases, there may be an easy solution that involves just rebooting or resetting the machine, but if not, then getting professional help is always an option too.
How To Fix a Keurig Mini That Won't Brew
If you're having issues with your Keurig Mini Coffee Maker, there are some steps you can take to try and rectify the problem. To start, it is important to clean the machine thoroughly. This includes emptying any water from the reservoir and unplugging the device. Once this has been done, you may want to attempt a full reset of the machine by pressing and holding down the power button for several seconds before disconnecting it from its power source.
Another potential cause of this malfunction could be due to its programmed shutoff feature - every sixty seconds, when not in use, it will turn itself off automatically. This means that when left unattended or idle for an extended period of time, it will power down, which could lead it to not work properly. This is essential when troubleshooting, as this could be a contributing factor to why it isn't brewing correctly.
Why Is My Keurig So Slow?

When it comes to Keurig coffee makers, they can start to become slower and slower as they age. This is due to the buildup of residue in their water lines and concentrated needle lines, which prevents proper functioning. To address this issue, one must unplug the machine and clean the inside so that any gunk can be removed from the water lines.
Failing to routinely maintain a Keurig coffee maker may result in clogged components that impede its performance, resulting in slowdowns or even complete stoppages of operation. The water and concentrated needle lines are essential components of the brewer, so these areas must be free from built-up residue. A simple cleaning process can help ensure that these parts of your Keurig continue to function optimally.
When cleaning your Keurig, ensure you unplug it first before taking off the back panel where access to both water lines is necessary. Depending on how much residue has built up within these components, you may need an appropriate cleaner to eliminate unwanted substances. When dealing with residues such as old grounds or other debris, using a soft brush can help loosen particles that could have been causing obstruction when brewing your coffee.
Contact Customer Support
When troubleshooting a Keurig Coffee Maker, it can be quite challenging to pinpoint your exact issue. Whether it's with the Keurig K55 or even the Keurig K-Duo, identifying problems can be difficult. That's why it's sometimes better to reach out and get support from Keurig's customer service team. They have extensive experience in resolving any issues individuals may have with their coffee makers.
The people in the customer service department are incredibly friendly and knowledgeable about fixing any issues you might have with your coffee maker. No problem is too big or too small for them to handle. They have been able to help me personally whenever I've had trouble understanding how something works on my Keurig machine, so I would recommend calling them if you ever find yourself stuck on a certain issue.
Conclusion
If your Keurig isn't being cooperative, you are probably wondering why my Keurig won't brew. Don't worry – our guide on troubleshooting your Keurig and fixing common problems can help you get back to brewing coffee in no time. All of the tips we have included in this article should ensure that your machine is fully functional again. After addressing any problems with these steps, you'll be able to enjoy coffee from your machine again.
Frequently Asked Questions (FAQ)
What is the most common issue with Keurig?
The most common issue with Keurig machines is clogged components. This can be caused by built-up residue in their water lines and concentrated needle lines, which prevents proper functioning. To address this issue, one must unplug the machine and clean the inside so that any gunk can be removed from the water lines.
How do I reset my Keurig?
You can reset your Keurig machine by pressing the "Brew" button three times in a row quickly. Additionally, you can try a full reset of the machine by holding down the power button for a few seconds. This should reset your machine and return it to its original factory settings.
How often should I clean my Keurig?
You should clean your Keurig coffee maker at least once a month to ensure optimal performance and reduce the risk of clogs or slowdowns. Additionally, if you are using flavored syrups or other sweeteners, it is recommended that you give the machine a deep clean every three months. By regularly cleaning your Keurig, you can help prolong its life for many years.
What kind of cleaner do I need to use on my Keurig?
You should use a mild cleaner such as vinegar or lemon juice when cleaning your Keurig. These are safe and effective ways to remove any buildup of residue within the machine's components. You can try using an appropriate cleaning brush to remove more stubborn debris. However, it is important to avoid harsh cleaners as these can damage your Keurig machine over time.
Does my warranty cover repairs for my Keurig?
It depends on the specific warranty that comes with your product. Generally speaking, most warranties will not cover repairs for issues caused by improper installation or misuse of the product. Additionally, some warranties may only cover certain parts or components of the machine, not necessarily the whole thing. It is important to check the details of your specific warranty before attempting any repairs.
Where can I get help if I have other problems with my Keurig?
If you are having issues that are not covered in this article, there are a few options you can turn to for help. You can contact Keurig's customer service team by phone or email. They have extensive experience when it comes to resolving any issues individuals may be having with their coffee makers and will be able to provide further assistance. Additionally, several online forums are dedicated to troubleshooting and repairing Keurig machines, where you can find invaluable advice from experienced users.
Check out Lifeboost Coffee Medium Roast.
References:
Drop a Comment
Not impressed with Keurig!
our electric went off line the result the duo maker will turn on but won’t let us select the size of cup and turn on … thanks !
The si gle cup brewer on my DUO only dribbles water into the cup and not a full stream. It is only 2 1/2 months old, and has only been used a few times.
Machine will not work after a power outage. What does it need